
There comes a time in everyone’s life when they find themselves struggling to feel the cold, crisp breeze of air that floats from the car air conditioner. Especially if it is a hot day in the middle of summer, which can make the situation 10 times worse.
At this point, you are bound to start wondering How To Flush AC System with Alcohol? and what could be wrong and delaying the burst of cold air?
This is usually caused by debris and dirt caught inside the AC components that are disrupting airflow. Don’t worry, most AC failures are usually not a big issue and can be fixed and cleaned by flushing the AC system to remove the nasty grit, dirt, and debris without even requiring the mechanic’s help!
Let’s walk through the step-by-step guide to find out how to flush your AC system with the help of alcohol to clean the AC like a pro!
Table of Contents
Why and How To Flush AC System with Alcohol?
To flush an AC system with alcohol, get a can of AC system flush, locate the low pressure port, and attach the flush can. Purge the old refrigerant and oil, add new refrigerant, start the vehicle, and turn on the AC system to circulate the refrigerant. Check for leaks and properly dispose of old refrigerants.
Why should I flush my car AC?
Flushing is a rather simple and effective way to get rid of all the impurities and pesky particles that keep getting caught within your AC component and circuit, preventing and reducing your visits to the local mechanic for problems that can be dealt with at home.
It prevents damage from occurring to other crucial components such as the condenser and compressor. Either way, flushing your AC is mandatory whenever you replace the compressor.
Choosing the best flushing liquid before jumping in
You can make the task of flushing your AC a rather fun and easy experience, especially if done right using the best flushing liquid, ideally one that evaporates rapidly at even room temperature without leaving behind any sticky traces.
Let’s take the example of denatured alcohol as our choice flushing fluid as it essentially leaves no mess behind that can damage or mess with oil viscosity, which can potentially cause the compressor to break down.
Note: Alcohol is excellent for the final flushing to rinse out all the dirt.
In case alcohol is not your first and favorite option, try opting for mineral spirits, especially if you are someone who is searching for economical flushing fluid or even choose from alternatives such as brake cleaners.
Now that we have discussed why flushing is essential and which is the best liquid for flushing, it is time that we move on to the real deal!
We understand that flushing your AC system might not exactly be a walk in the park, but the following guide will make it a much simpler and hassle-free procedure that you might start looking forward to!
Read our article on how to find leaks on car air conditioner.
Preliminaries
#1 – Wear adequate protection
Before beginning the procedure, it is essential for you to wear proper and secure eye protection as the liquid might splash or get rubbed into your eyes or you might rub them after touching the flushing liquid. This can prevent irritation and any serious damage.

Besides this, it is important to wear gloves at all times while flushing your AC system. Wearing rubber gloves will keep your hands away from irritating and harsh chemicals and other potentially harmful mishaps while handling the AC system.
#2 – Gather the right tools
You need to gather the right and appropriate tools for the task at hand, including the correct refrigerant recovery device, adjustable wrench, lubricants, and an air compressor.
Simultaneously, try to assemble the required tools for the task which would include the correct lubricants, air compressor, adjustable wrench, and refrigerant recovery device.
Step-by-Step Guide on flushing your AC System with alcohol
Note: It is crucial for you to remember that you should under no circumstances ever flush the accumulator, expansion valve, and orifice tube since flushing can damage them. DO NOT flush your compressor as it will not survive this and be damaged severely.
Step 1: Empty out the refrigerant
To empty out the refrigerant correctly, you need to follow the guidelines stated in your owner’s manual. If you cannot find yours, it is best advised to call them.
Step 2:Take out and disconnect the pipes and wires
You need to move on to remove all pipes from the part or components that you are going to flush, proceed by disconnecting the orifice tube first. The orifice tube is situated in the evaporator or liquid line.
Carefully remove the hose that might be getting in your way such as the condenser, the evaporator, and so on.
Step 3:Time to flush the condenser
Begin by finding the high-side inlet which is located somewhere on the condenser. After you have found it, start pouring alcohol carefully into the component through this particular hole. After this, you need to apply compressed air into the hole.
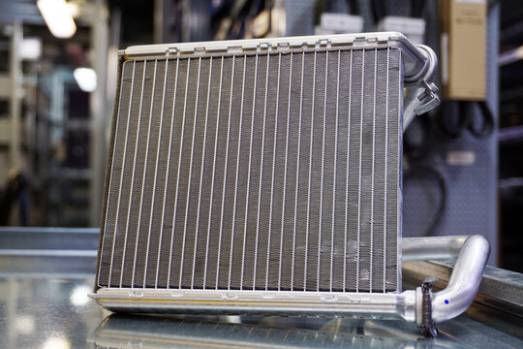
You need to keep pressurizing the condenser until there are no traces or pieces of contaminants and debris in the solvent.
No one wants to leave a mess behind so try to catch the alcohol that spills or misses the high-side inlet hole or as it finds its way through the condenser’s outlet hole. Keep a clean rag near you at all times.
You can also catch and throw the dirty flushed-out alcohol with the help of a hose that would be connected to the exit hole of the component and falls into a container or bucket.
Step 4: Time to flush out the evaporator
It is finally time to flush out the evaporator by following the same procedure as listed above to flush out the condenser i.e., to begin by carefully pouring alcohol liquid into the component and then proceeding to apply compressed air to dislodge and expel all the debris and dirt through the exit end.
Pro-tip!
Pro-tip!
Whenever you perform the task of flushing next, you should consider the method of backflushing. Backflushing refers to the procedure of flushing from the inlet towards the outlet, instead of vice-versa, in condensers and evaporators to dislodge all that dried-up debris.
After performing this method, you would need to keep flushing the components constantly for a few minutes to be sure to shake and force out all the dirt.
Step 5: Recharge and reassemble
Once you are done flushing out the dirt from all the required components, you need to reassemble the components, place the refrigerant to its original source, and lastly, test the AC system’s cooling performance.
Frequently Asked Questions
Can I clean my AC with alcohol?
It’s not recommended to clean your AC system with alcohol, as it can damage the internal components. Instead, use a designated AC cleaner or mild detergent and water.
What can I use to flush my AC system?
To flush your AC system, use a dedicated AC flush solvent or cleaner specifically designed for automotive air conditioning systems.
Can you use brake cleaner to flush the AC system?
No, don’t use a brake cleaner to flush the AC system, as it can damage the components. Use a specialized AC flush solvent or cleaner.
Can you use mineral spirits to flush the AC system?
No, mineral spirits should not be used to flush the AC system, as they can damage the system components. Use a designated AC flush solvent or cleaner.
Conclusion
An AC system that provides warm and dull air can frustrate anyone but don’t worry! Your AC is probably covered with dirt and debris which naturally accumulates over a period of time and cleaning it requires a decent amount of effort from your end with a sprinkle of fun.
You can flush out your AC system all by yourself, but you need to be mindful when choosing the right solvents and tools for the task. Try to use a solvent that leaves no residue behind and is easy to cleanout. And after that, take a look at our simple and effective steps to flush your AC.