
Do you want to disable your car from starting but don’t know how to go about doing it? If you live in a neighborhood prone to getting carjacked, or you want to make sure your kids can’t accidentally start the car without an adult present, then you’ve come to the right place to make sure of this.
We are here to help you.
Table of Contents
How To Disable A Car From Starting?
To disable a car from starting, one option is to disconnect the battery or remove a fuse related to the ignition system. It is also possible to disable the starter by disconnecting the starter cable or solenoid wire.
Here are some other ways for how to disable a car from starting.
- The quickest way to disable a car from starting is to simply disconnect the battery. (However, an experienced thief or car expert would be able to reconnect the battery quite quickly.)
- If disconnecting the battery is not enough for you, you can install a battery disconnect switch.
- Finally, you can install a fuel pump cutoff switch. This particular switch is designed to disconnect power to the fuel when your car has stopped.
Top 3 ways to Disable a Car From Starting
1. Disconnect the Battery
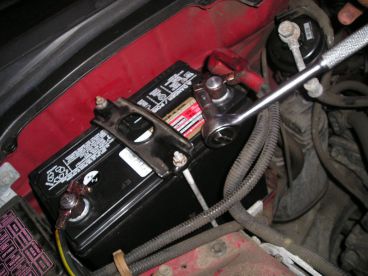
Important Note: Before you begin the process of disconnecting your car battery, make sure that you aren’t wearing anything made of metal, like jewelry or a watch. This is because batteries have an electric charge in them, and if any metal comes in contact with the battery, you can be injured because of an electric shock.
You will need:
- A socket wrench
- A socket wrench extender.
To disconnect the battery:
- Begin by turning the ignition off and opening the hood of the car.
- Find your car’s battery; in some models, it might not be under the car’s hood, but underneath a car seat in the trunk.
- Next, look for the negative terminal above the battery. There will be a negative (-) sign on top of it, indicating that it is the negative terminal. Again, it’s essential to remove the negative terminal first because it prevents sparks from flying, which could cause the car battery to explode.
- Look for the properly sized socket. What this does is loosen the nut on the negative connector.
- Turn the socket wrench counterclockwise and disconnect the negative connector by pulling it off. Make sure you place as far away from the battery as possible.
- Next, repeat the same procedure with the positive terminal. Ensure that this positive terminal DOES NOT make contact with any metal parts of your car. If any charge is lingering in the system, your car’s electrical circuit could be damaged
Please note that while this method is quick and straightforward, there are some downsides. Click here for more information.
2. Install a Battery Disconnect Switch
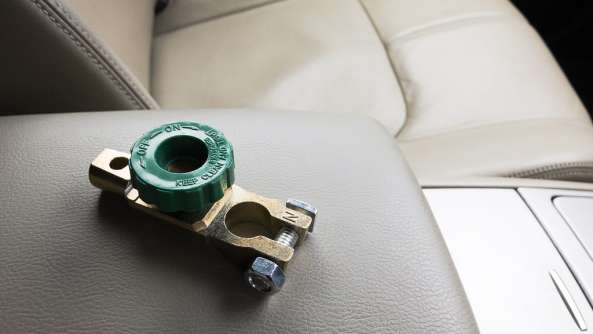
While disconnecting the battery is quick and easy, it may cause a few problems down the road, such as causing the engine to run poorly in the future, or your car can have trouble starting later on. However, this process is also quick and straightforward! If you’re willing to spend less than $15, installing a battery disconnect switch is the way to go.
Here’s what you’ll need:
- A wire cutter
- A crimper
- Extra battery wire
- The hardware to mount your switch
- The battery disconnect switch itself
Here’s the quick step-by-process:
- Remove the negative cable from the battery. (As we mentioned earlier, it is crucial to remove the negative terminal first to prevent sparks from flying and the battery from exploding.)
- Install the switch between the negative cable and the battery terminal.
- Move the negative cable you removed from the battery back to the disconnected area, ensuring that you fasten it firmly.
- To check if the disconnect switch is working correctly, turn the knob on the switch counterclockwise to turn the switch on and the battery off, and clockwise to turn the switch off and the battery on.
If you’d like to try this out but need visual instructions, click here to watch a short video guiding you through the same process.
3. Install a Fuel Pump Cutoff Switch
The fuel pump cutoff switch is designed to disconnect the power to the fuel pump when your car stops. The switch disrupts the flow of electricity, and in addition to disabling a car from starting, the cutoff switch also helps prevent car thefts and fires during a car crash.
Here’s what you need to install the cutoff switch:
- The multimeter switch
- 16 gauge wiring
- A multimeter
- Wire strippers
- A heat gun
- Safety glasses
Here’s the step-by-step guide to installing the fuel pump cutoff switch:
- The most important part of this process is finding your fuel pump relay because it is located in different areas in different cars. To make life easier for yourself and quicken this process, simply read your owner’s manual to tell you where it is.
- Once you’ve located the relay, disconnect the wiring harness from the connector.
- Before disconnecting the wire that delivers electricity to the fuel pump, first make sure that you disconnect the correct wire.
To do this:- Take the multimeter and connect the black probe to a bare metal surface.
- Retake the multimeter and turn it on to DC volts.
- Set it to 20 volts, because the highest voltage you’ll see is 12 volts.
- Take the red probe on the multimeter, and insert it into each of the plugin slots. These are connected to the end of the wires from the car’s electrical system.
- Turn the car key into the ‘run’ position and insert the probe again into each plugin slot. This will tell you which wire is the trigger wire.
- Remove the negative cable from the car battery to prevent a fuse from blowing.
- Cut the wire, then take the wire stripper and strip each end of the wire that you just cut.
- Find a spot to install the switch, ensuring that it’s not in a prominent or visually accessible place. Just make sure that you can reach it from the driver’s seat. Check to see if you can route the wires from the area you’ve chosen, keeping in mind that you might need to drill a hole.
- After you’ve decided where to place your switch, drill a hole that can switch the fuel cutoff switch.
- Once the hole is drilled, insert the switch. Hold it in position firmly and tighten the rig nut on the exterior portion of the switch body.
- Next, you need to run the wire from the switch to your fuel pump relay. Measure a pair of the 16 gauge wires from the switch to the fuel pump relay.
- Strip the ends of the wires, and then heat shrink both wires.
- Since the wiring process is almost complete, all that’s left to do is connect the wires to the switch. You can do this by using a butt connector to transfer the flow of energy from your car’s electrical system to the switch. First, make sure that the copper wire goes all the way into the butt connector, then crimp that side of the connector. Next, crimp down the other wire and then use the heat gun to shrink both connectors. Doing this will ensure that the connection is waterproof.
- Wrap the wiring harness in electrical tape, then push the connector back into the relay. Listen for a click so that you know the connector is secured firmly in the relay.
- Finally, don’t forget to reconnect the negative cable to the car battery!
If you would like to try installing a fuel pump cutoff switch to disable a car from starting, click here for a detailed YouTube video guiding you through each step of the process.
Conclusion
There is danger everywhere.
Leaving your car parked outside on the street at night can be a scary experience, especially in today’s world. However, even if you live in a safe neighborhood, you may have curious young children who have learned how to start a car without realizing what they are doing!
Our article has provided you with two different methods of disabling a car from starting. While you may be uncomfortable with mechanics, we’ve included a step-by-step guide to each method, which will help you get through the process more efficiently.